The DHCP Server window allows you to configure the DHCP server built-in to IPNetRouterX. In order to access the Internet, each computer on your LAN needs to be configured with four pieces of information (IP Address, Network Mask, Router Address, and Name Server Address). The DHCP server in IPNetRouterX allows other computers on your LAN to get this information automatically from IPNetRouterX by selecting "Configure via DHCP" in the corresponding TCP/IP control panel.
Using DHCP (Dynamic Host Configuration Protocol) avoids the need to manually configure each computer on your LAN before it can be used, and is especially useful if you have many computers on your LAN or frequently move computers from one network to another.
Before you can use DHCP to configure other hosts on your LAN, the DHCP Server itself needs to be configured. In most cases, you can simply press the "Use Defaults" button and enable the server by selecting "DHCP Server On". These settings assume you want to provide DHCP service on the first internal interface listed under the Interfaces tab in the main IPNetRouterX window. Your LAN will use IP addresses from the IP Subnet configured for this interface and your gateway running IPNetRouterX will use the address of this interface as its local address. The Interfaces listed under the Interfaces tab are defined in the Mac OS X Network Preferences panel.
Warning: If you are connecting using a cable modem and single Ethernet, use caution when enabling the DHCP server since it could interfere with your ISP's own service. See "DHCP and Single Ethernet" below.
If your Local Area Network has additional requirements, you can use the DHCP Window to control what IP addresses to assign, to whom, for how long, and other operational parameters. The information in the DHCP Window is divided into five tables or panels which are briefly described below. For more information on DHCP, refer to RFC-2131, RFC-2132, or a good book on TCP/IP.

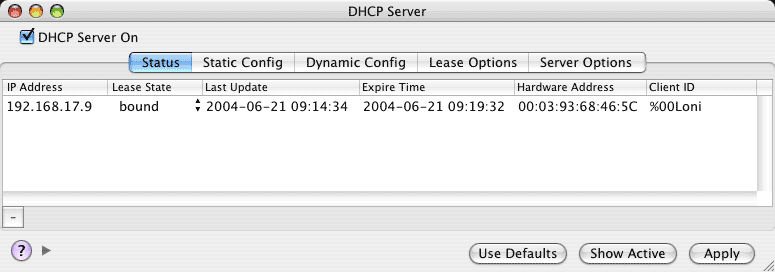
This table keeps track of Lease Bindings. What addresses are currently leased, to whom (hardware address or clientID), and when the lease expires. It also keeps a state value for each entry so it can track bindings that are not currently active (such as bindings that have been offered, released, or expired). The intent here is to remember previously assigned leases so clients will always get the same lease whenever possible. Finally, this table keeps track of when each entry was last updated so the server can re-use the oldest unused entry first ("Least Recently Used"). This table should normally be viewed as "Read Only", but you can use the Delete button on the lower left to remove an obsolete lease binding. You can also copy rows to the clipboard as text for use in other panels.
The Status Table is stored as a collection of ".plist" files in "/Library/Application Support/Sustainable Softworks/dhcpStatus". Any time a lease is granted to a client, the corresponding entry is written out (committed to non-volatile storage). If the server is stopped for any reason, it can recover all the current lease information from here. You can also move your DHCP Server to another machine by copying this folder and the corresponding IPNetRouterX configuration file.
This process of commiting lease information to non-volatile storage as required by the DHCP standard (RFC) does imply some disk activity and a tiny delay each time a lease is granted. In extreme cases where a server is responding to ten or more requests per second, you may notice some accumulated delay in responding to individual requests. Each file in the dhcpStatus folder holds a cluster of up to 16 leases (around 6KB), so writing these files is fast and can scale easily to many thousands of leases.

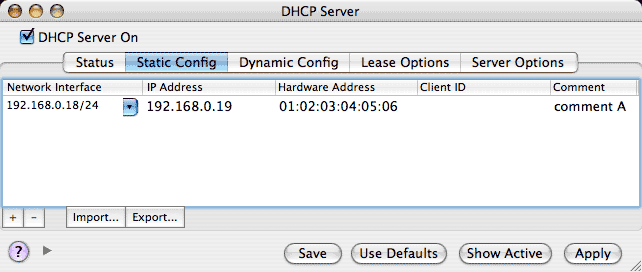
This table keeps track of any static address assignments the administrator wants to create. The fields are: (1) Network Interface - the IP address (and prefix length) of the interface a request must arrive on [If a host moves from one network to another, we need to assign a different IP address depending on which network it is attached to. If a BOOTP relay agent is used, we match this network as well.]; (2) Lease Address - the address to grant; (3,4) What host or client this address is reserved for as specified by the Ethernet hardware address or ClientID; (5) Comment - any notes you want to add. The ClientID will override the hardware address if specified in the table. Specifying an IP address of zero will prevent the corresponding client from being granted a lease. The entries in this table can be edited in place by double-clicking in a cell. Use the Add or Subtract buttons on the lower left to insert or delete entire rows. The "Import" button can be used to import static address assignments as tab delimited values, one entry per line containing an IP address, hardware address, and optional comment.
192.168.0.19 01:02:03:04:05:06 comment A
The Static Config Table is stored as part of your IPNetRouterX configuration when you save from the file menu.

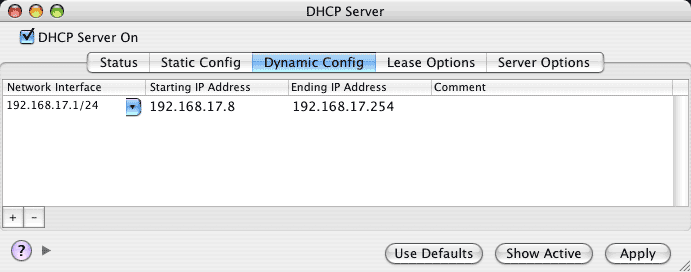
This table keeps track of ranges of IP addresses that can be automatically assigned to hosts as needed and later reclaimed. The fields are: (1) Network Interface - the IP address (and prefix length) of the interface a request must arrive on [Each network interface that accepts DHCP requests will normally assign IP addresses from a different range.]; (2) Starting Lease Address - start of range used for address pool; (3) Ending Lease Address - end of range used for address pool; (4) Comment - any notes you want to add. The entries in this table can be edited in place by double-clicking in a cell. Use the Add or Subtract buttons on the lower left to insert or delete entire rows.
There are no restrictions on how many address ranges can be defined to serve from multiple interfaces or multiple ranges on a single interface. Any IP address in a dynamic address pool that overlaps with an address in the Static Config Table will be reserved for static configuration and not dynamically assigned. The Dynamic Config Table is stored as part of your IPNetRouterX configuration when you save from the file menu.

This table stores the other information that is given out to clients based on what network they are attached to. The fields are: (1) DHCP On - DHCP serving can be selectively enabled on a per interface basis. (2) Network Interface - the IP address (and prefix length) of the interface a request must arrive on [Each network interface that accepts DHCP requests can potentially give out different information.]; (3) Routers - the router addresses for this network (comma separated); (4) Name Servers - the name server addresses passed out to clients on this network (comma separated); (5) Comment - any notes you want to add; (6) Default Lease Time - lease time granted if none is explicitly requested; (7) Maximum Lease Time - the maximum lease time to grant regardless of what is requested; (8) Search Domains - A default domain clients can use for DNS lookups;
As each row in the table is selected, the corresponding fields are displayed for the additional parameters below. The list of network interfaces available in the Network Interface popup can be configured in the Mac OS X Network Preferences pane. You can use the Add or Subtract buttons at the lower left of the table to create new entries or delete previous ones. When you create a new entry and select a network interface, IPNetRouterX will automatically fill in the other fields with proposed default values. If you specify a name server address of "0.0.0.0" or leave this field empty, IPNetRouterX will replace this with the current name server address for the gateway machine (displayed as "Host DNS" when the server is running). If your gateway computer itself is configured via DHCP for example, this will automatically forward the DNS address the gateway received to any DHCP clients. The Lease Options Table is stored as part of your IPNetRouterX configuration when you save from the file menu.

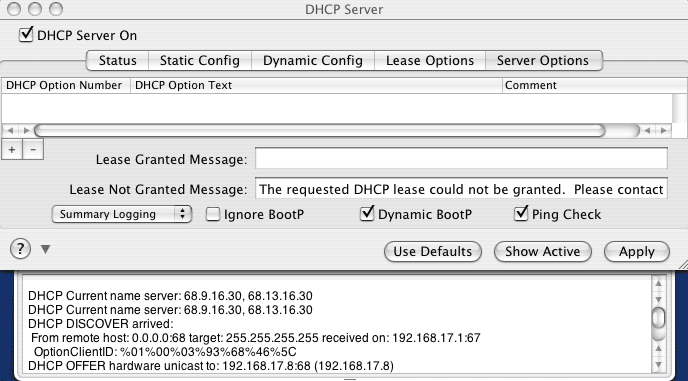
The Server Options tab allows you to specify additional DHCP text options if desired and select other server wide features. Use the Add or Subtract buttons at the lower left of the table to insert or delete entire rows. The fields are: (1) Option Number - the DHCP option number; (2) Option Text - the text you want the server to respond with when the corresponding option number is requested; (3) Comment - any notes you want to add.
The DHCP Server can send an optional "User Message" when a lease is granted, or a request is denied (which may be displayed to the user depending on their DHCP client software). The request denied message defaults to: "The requested DHCP lease could not be granted. Please contact your System Administrator." The lease granted message is empty by default.
The Logging popup selects the amount of detail recorded in the DHCP Server log drawer. The options are Exception Logging, Summary Logging, and Verbose Logging.
Some clients may use BOOTP, an older subset of DHCP. BOOTP clients are normally not eligable to receive dynamic IP addresses because BOOTP does not provide any mechanism to reclaim an expired address. To avoid requiring the network administrator to create a static assignment for each BOOTP client, IPNetRouterX will try to assign BOOTP clients a dynamic address if no static configuration is found and display a warning message in the log window. In order not to lose addresses permanently, the server will try to reclaim "BOOTP dynamic addresses" after 60 days. You can disable this feature by unchecking "Dynamic BootP" under the Server Options tab. You can also tell the DHCP Server to ignore older BootP clients entirely by selecting "Ignore BootP".
Normally the server tries to ping an IP address to see if it might already be in use before offering it to a client. If a client at that address responds, the address is marked "In Use" and won't be offered to another client until the administrator deletes the corresponding record or the address reclaim period expires. The server waits 200ms for a possible ping response before proceeding to offer a new address. You can disable this feature by unchecking "Ping Check" under the Server Options tab.
When you edit data in place, you are editig a visible copy of the data on the display. To have your changes take effect, you must press "Apply". To save your DHCP settings to an IPNetRouterX configuration file, open or make active a corresponding IPNetRouterX document and then select "Save" from the file menu. You can return to the previously applied settings the server is using by pressing "Show Current". You can return to any prevoiusly saved settings by opening the corresponding settings file and then opening a DHCP window. Finally, you can restore the suggested default settings by pressing the "Use Defaults" button followed by "Apply".
DHCP should be seen as a mission critical service since hosts on your LAN may not be able to use the Internet if your server is unavailable. DHCP is designed so that more than one server can be configured to serve the same network and even offer the same range of IP addresses if desired for redundancy. Clients normally try to renew an existing lease and only the Server with a record of that lease will respond. If the existing lease cannot be renewed, the client may then try to obtain a new lease. The Server pings any new proposed lease address before offering it to a client to check that the address is not already in use. If the Server discovers an address conflict, it will mark the corresponding address in the Status Table as "In Use" or "Declined" and no longer try to assign it. You can see when the conflict was detected from the "Last Update" column in the Status Table. In order not to loose addresses permanently, the server will try to reclaim "In Use" or "Declined" addresses after 60 days.
Since the Status Table is kept as XML text in the "dhcpStatus" folder, you can edit this table manually if desired.
Use Apple's Console.app to examine the "system.log" for any error messages.
Check that the built-in Internet sharing feature is turned off. This enables another DHCP Server (dhcpd) that will prevent IPNetRouterX from binding to the DHCP server port (67).
Try restarting your system.
DHCP uses IP broadcasting to communicate with clients that are not yet configured with their own IP address. If you are using the same physical Ethernet as both your Internal (LAN) and external (ISP) interface, the DHCP Server could respond to requests from other clients on your ISP's network resulting in network confusion and your service being terminated. You must be very careful to configure the server so that it will only hand out addresses to clients on your LAN. You can use the Static Config tab to specify addresses for individual clients on your LAN. Make sure there are no "Dynamic Config" ranges available. As long as there are no lease bindings available, the server will ignore DHCP Discover requests from other clients.
For more information on DHCP, refer to RFC-2131, RFC-2132, or a good book on TCP/IP.