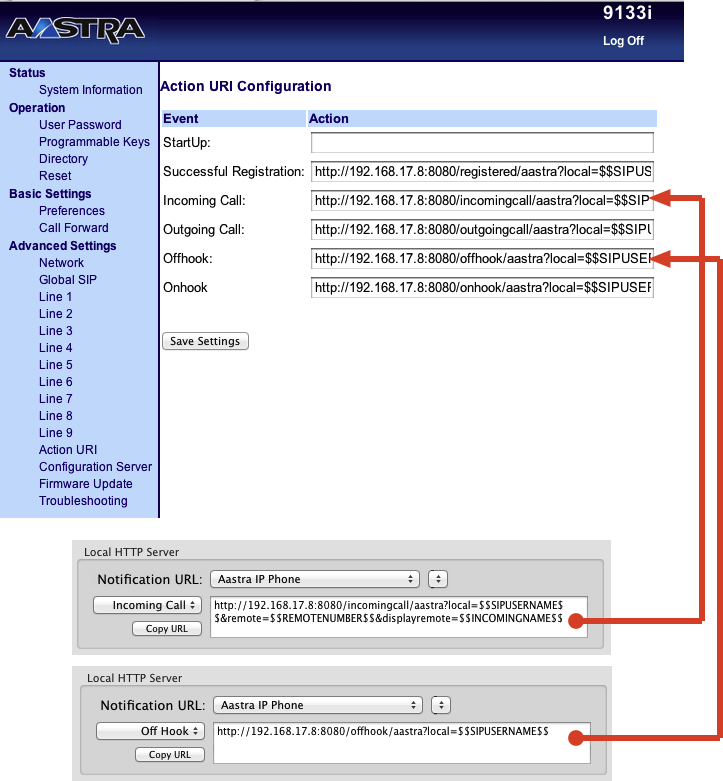
Phone Amego makes this easy to configure from the Caller ID tab as shown.
1. Point your web browser at the IP address of your phone http://ipAddress.
To show the IP address of your phone, use the buttons on your phone to navigate to
"Options -> Phone Status -> Network Port 1 -> IP Address".
2. Login with your username and password.
For Aastra, the defaults are username "admin", password "22222".
3. Navigate to "Aastra -> Advanced Settings -> Action URI".
4. Copy and paste the corresponding URL for each action.
Copy from the Local HTTP Server box under the Caller ID tab in Phone Amego,
and paste to the corresponding field in your web browser.
5. Once you have entered the URL for each telephone event,
scroll down to the bottom of the page and press "Save Settings" .
6. Navigate to
"Aastra -> Advanced Settings-> Configuration Server -> XML Push Server List"
Enter the IP address of the local HTTP server as shown in the notification URLs.
Press "Save Settings".

7. Navigate to "Aastra -> Operation -> Reset".
Press the "Restart" button to restart your phone.
It may take 30 seconds to a minute for your phone to restart.
8. Within Phone Amego, press and hold the Command key on your Mac keyboard while you
pickup the handset on your phone. When Phone Amego sees the "Off-hook" event with
the Command key down, it will add your phone to the telephone devices table and should
then be ready to recognize call events.
When you are ready to place a call, select your Aastra IP phone as the telephone device and dial normally using Phone Amego. You may be prompted for your login password the first time you try to dial if needed. You can also set your password explicitly by double-clicking on the corresponding entry in the Telephone Devices table. See Dialing to enable the "Dial With Phone Amego" application service if desired. You can press and hold Control to have Phone Amego display the WebKit window it uses to access your phone. It should indicate data was sent to your phone successfully.
If you wish to remove your phone from Phone Amego, select it in the Telephone Devices table and press the "-" button. To add it back, press Command while you lift the handset on your phone.
The configuration procedure above depends on your Aastra phone being able to find Phone Amego at a known IP address. Please see IP Addresses and DHCP for additional information.
Access Control
Only hosts whose IP address is included in the "XML Push Server List" will be allowed to dial your phone.
Which Aastra Phones Are Supported?
Phone Amego is designed to support modern SIP phones including the Aastra 67XX series. Caller ID has been tested to work on previous models including the Aastra 480i and Aastra 9133i, but these phones do not provide commands for dialing directly from a host application in the latest firmware version tested (1.4.3.1001, 2008). In this case, you may be able to use a compatible web service for dialing such as CallCentric or Google Voice. To configure this, double click on the corresponding entry in the Telephone Devices table and select "Dial Using" the desired service.
Testing Notes
I tested caller ID support on an Aastra 9133i that was kindly donated for this purpose. Unfortunately I discovered that commands for dialing directly from a host application were added in a later firmware version (used on the 67XX series) and are not available on the 480i or 9133i.
Things I liked:
- Easy to get working. Nice Web UI navigation.
- Plenty of good sound.
- Lit buttons and powerful features for use with Asterisk.
Not as nice:
- Many imcompatible models make support complicated.
- Older models don't support computer dialing.
- XML interface is fussy. Phone can be temporarily frozen if commands aren't properly formatted. Displays "Page Load Error" when host computer is not available.
