User Guide
Contents
Internet Sharing Using A Cable/xDSL Modem and Only
One Ethernet

These directions assume that you normally connect to the Internet
using a cable/DSL/ADSL modem. To share your cable/DSL/ADSL modem
with other machines on your ethernet LAN, your cable/DSL/ADSL modem
and the machines on your LAN should be connected through an Ethernet
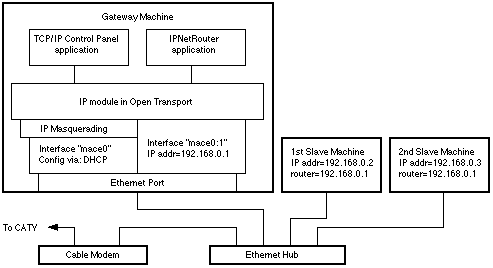
hub. See the above diagram. In the single ethernet setup, the cable/DSL/ADSL
modem is attached to the "UPLINK" port of the hub; the
gateway and client machines are connected to regular ports of the
hub.
Alternatively, if you have two ethernet ports in your gateway machine,
you can connect the cable/DSL/ADSL modem to one Ethernet, and your
LAN to the other (in this case, your private network interface will
be on your 2nd ethernet). The dual
Ethernet configuration has important
security and other advantages you may wish to consider. Ethernet
networking is covered in more detail in the Ethernet
Basics section.
The basic steps to configure IPNetRouter to work with a cable/DSL/ADSL
modem in the single ethernet port setup are as follows:
- On the gateway machine, use the TCP/IP control panel to configure
the Ethernet interface to use your cable/DSL/ADSL modem as instructed
by your service provider (example: @Home). Make SURE that the
"Load Only When Needed" option is UNCHECKED (you
must be in Advanced User mode to get to the TCP/IP options. Choose
User Mode under the Edit menu and select Advanced). If you can
already access the Internet from this machine via your cable/DSL/ADSL
modem and you are SURE that the "Load Only When Needed"
option is UNCHECKED in the TCP/IP control panel, you're ready
to proceed to the next step. (Note: If your ISP requires the use
of a PPPoE client, you should use the instructions in the PPPoE
section to configure your gateway.)
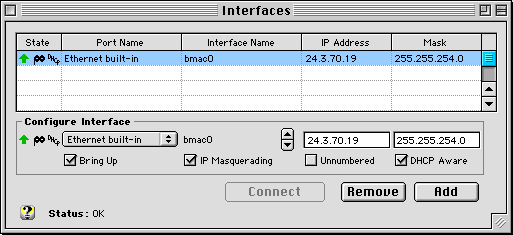
- Startup IPNetRouter on the gateway machine. In the Interfaces
window, click on the top row (with your public IP address on the
ethernet port). With this interface selected, check the "IP
masquerading" box and then press Add (if you receive your
IP address via DHCP from your cable/DSL/ADSL modem or DSL modem
provider, then also check the "DHCP Aware" box). You
should see a little mask icon appear in the state column for the
Ethernet interface (and a DHCP icon if you checked the DHCP checkbox
and added this feature). Notice you need to enable IP Masquerading
on the interface that communicates directly with your cable/DSL/ADSL
modem. Your Interfaces window should now appear similar to the
following (your IP address and mask values will vary depending
upon those values assigned by your ISP):

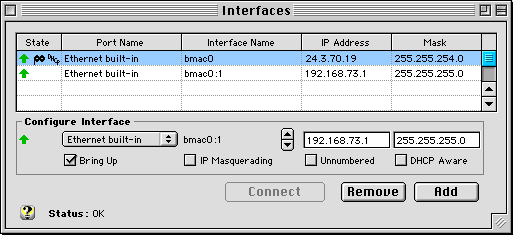
- Next you need to create a 2nd IP interface on your Ethernet
port. Continue to work in the Interfaces window using the "Configure
Interface" input area just below the main display grid. Select
Ethernet from the popup menu under the Port Name column. Click
the up arrow to the right of the Interface Name field once. You
should see ':1' added to the interface name. Enter a private IP
Address and Mask. We suggest an IP address like 192.168.X.1 (where
X is a number between 1 and 254...in this example we choose 73,
but you should choose your own subnet number) and a mask of 255.255.255.0.
Only the "Bring Up" checkbox should be checked. Press
Add. You should see all the values you just entered appear in
a new row in the main Interfaces table. Your Interfaces window
should now appear similar to the following:

You might ask why we choose the 192.168.73.X subnet for this
installation. The reason is that you do NOT want to have conflicting
private IP addresses with other potential NAT router users out
on the cable/DSL/ADSL/DSL modem network. (One reason we suggest
dual ethernet might be preferable.) The most often used private
IP subnet is 192.168.0.X, so you probably want to avoid using
this subnet for your private network. This is why we went with
the 192.168.73.1 IP address for the IPNetRouter machine. You
can use any different subnet, such as 192.168.149.X, etc.. Just
make sure to address your client machines accordingly.
- Select Save As from the File menu to name and save your configuration.
Then just double click on this config file anytime you want to
startup IPNetRouter with this configuration. You can put an alias
to this config file in your Startup Items folder so that it runs
automatically at each startup. Your gateway should now be working!!!
[If it doesn't work right away, try restarting once to give Open
Transport a chance to rebuild your TCP/IP stack with the supplied
Proxy module inserted.]
Now each slave machine on your LAN needs to be configured to take
advantage of this new gateway. The general idea is as follows:
- Each slave machine needs its own unique IP address from the
same private sequence that the gateway is using. In the above
example the gateway is at 192.168.73.1, so your slaves should
each use a unique addresses like 192.168.73.2, or 192.168.73.X
where X is anything from 2 up to 255.
- All the slave machines need to be told to use the gateway machine
(192.168.73.1) to access the Internet. So set the Default Gateway
(router) parameter of all slaves to 192.168.73.1
- You can use the IPNetRouter IP address as the Name Server address
in each of the clients (e.g. 192.168.73.1). Just make sure that
the DNS forwarding option is checked in the Gateway window of
IPNetRouter. (You MUST be running IPNetRouter v1.4.8 or later
for DNS forwarding). Otherwise you need to enter the true Name
Server for your ISP in each of the client machines.
- Important: You SHOULD NOT use the DHCP server within
IPNetRouter to configure your client machines when using this
single ethernet setup. If you do so, your IPNetRouter gateway
becomes a DHCP server for the entire cable/DSL modem network and
your Internet connection may be terminated by your service provider.
Other servers such as mail and news servers should all be set to
the standard values specified by your provider (@Home). You may,
however, have to use FULLY SPECIFIED DOMAIN NAMES for Mail servers
when accessed from your client machines (e.g. instead of just using
"mail" for the SMTP mail server, you might have to fully
specify the name like "mail.srst1.fl.home.com"). Also
make sure the slaves each have a unique IP address and will use
the gateway (192.168.73.1) as their default gateway. On a Mac use
the TCP/IP or MacTCP Control Panel, on Win95 use the Network Control
Panel.
Additional Notes:
You may need to power cycle your cable/DSL modem if it was being
used by something other than the gateway Mac previously. The safest
thing to do is to turn on the cable/DSL/ADSL modem first, then the
gateway Mac. Access the Internet from the gateway Mac to make sure
the cable/DSL/ADSL modem learns the gateway's address before any
other. After the cable/DSL/ADSL modem has seen the gateway Mac at
least once, you can power up any of the devices in any order until
you power cycle the cable/DSL/ADSL modem. Then you'll need to make
sure it sees the gateway Mac first.
The 10Base-T Ethernet interface on cable/DSL/ADSL modems is usually
designed to act like a hub port. This should attach to the uplink
port on your 10Base-T hub, or you will need to use a "crossover"
cable/DSL/ADSL. See Building Your Own
Low Cost Ethernet for details.
If you need to determine the IP address of the default Name Server
(DNS) which your ISP has you currently using, you can use the tools
in IPNetMonitor to determine this IP address. From the gateway machine,
launch IPNetMonitor and open the NSLookup Window (Name Server Lookup).
From the NSLookup window, open the Ping window (Cmd-T), this will
invoke a ping test to your default Name Server used by NSLookup.
Your default Name Server address will be visible in the Ping window.
You could then use this IP address in each of your client machines...
but just using the IPNetRouter address with DNS masquerading is
normally much easier.
If your gateway is configured using DHCP in the TCP/IP control
panel, you should check the "DHCP aware" checkbox for
the corresponding IP Interface in the IPNetRouter Interfaces window.
This tells IPNetRouter to use your dynamically assigned DHCP address
instead of the address saved with your configuration file when IPNetRouter
restores your saved settings.
IP Addressing: I chose the example IP addresses from network
192.168.x.x because this network range is reserved for private LANs
(see RFC 1918). In order to route IP datagrams between two networks,
each network must normally have its own network number (the most
significant part of the IP address logically ANDed with the network
mask). If you wish to follow the suggested example, each machine
on your ethernet LAN must have a unique address from network 192.168.73.x
(192.168.73.1, 192.168.73.2, 192.168.73.3, etc.). The Macintosh
running IPNetRouter (192.168.73.1 in this example) becomes the default
router or gateway for the other machines on your ethernet LAN.
The Benefits of Dual Ethernet
Internet Sharing
While IPNetRouter has been designed to handle single ethernet configuration,
we often recommend a dual ethernet setup in conjunction with ethernet
xDSL and cable modems because:
- A dual ethernet configuration
is much more secure since the private LAN is physically isolated
from the internet and your ISPs cable modem or xDSL network. Physical
isolation of your private LAN interface makes it much harder to
use various hacking techniques to disrupt or "spoof"
your network interfaces or steal files off of your computers.
While you should not worry about this sort of security issue too
much, its better safe then sorry, especially where money or reputation
is of import. See the Firewall section for more on how to secure
your gateway.
- There is potential for IP and Appletalk conflicts between your
local LAN and the rest of your ISP's network. Someone else on
your ISP's cable modem or xDSL network (WAN) might be running
a NAT router (Mac, Windows, LINUX, etc.) in a single ethernet
configuration and choose the same IP subnet (addresses) for their
own client machines/gateway. In that case, one of you will get
bumped (your ethernet driver will likely shut down). There are
other conflicts that might occur that are equally as unpleasant.
The risk of Appletalk conflicts has declined sharply as ISPs learn
the dangers of permitting unbridled packet transmissions on their
WANs. The problem with private IP conflicts is likely to remain
indefinitely. Using a dual ethernet setup will remove this from
being a problem on your own private network.
- The dual ethernet configuration offers much better performance
in many instances. In the dual ethernet configuration, packets
are routed over physically separate interfaces, drastically reducing
potential packet collision and routing problems between your IPNetRouter
gateway, the internet, and your private LAN.
- You should not run IPNetRouter's DHCP server with the single
ethernet setup since, as specified in the standards governing
DHCP, a DHCP server is limited to the primary IP address on a
physical interface. In the case of a single interface Internet
sharing arrangement, the primary interface must be reserved for
the cable modem/xDSL IP interface. (Note: This limitation does
not apply if you are connecting to the internet solely from a
phone dialup connection. It only applies if the DHCP server would
serve IP addresses to the same physical ethernet interface as
the Internet connection of the gateway.) This may or may not be
important to you, depending on whether you wish to use IPNetRouter's
DHCP server feature.
In order to benefit from dual ethernet, you will usually have to
purchase an additional ethernet card for your Mac. When purchasing
ethernet cards, check with the manufacturer to see if your OS, Mac
hardware, and multihoming IP is supported. Also consult our nettalk
user archives for more feedback from other users about a particular
card's effectiveness. The Troubleshooting
section describe some ethernet card/MacOS compatibility issues
to be aware of. If your gateway computer does not have the ability
to take two ethernet cards or you are interested in using other
types of interfaces, see the relevant sections elsewhere in this
guide. The IPNetRouter FAQ is a
good starting point.
|

 Privacy
Policy
  Contact
Us
 Privacy
Policy
  Contact
Us