User Guide
Contents
Connecting to the Internet Using a Cable/DSL/ADSL Modem and Dual
Ethernet

These directions assume that you normally connect to the Internet
using a cable/DSL/ADSL modem, and that you have a 2nd ethernet port
(card) used to connect to your LAN.
The basic steps to configure IPNetRouter to work with a cable/DSL/ADSL
modem in this dual ethernet port setup are as follows:
- On the gateway machine, use the TCP/IP control panel to configure
the Ethernet interface to use your cable/DSL/ADSL modem as instructed
by your service provider (@Home). Make SURE that the "Load
Only When Needed" option is UNCHECKED (you must be in
Advanced User mode to get to the TCP/IP options. Choose User Mode
under the Edit menu and select Advanced). If you can already access
the Internet from this machine via your cable/DSL/ADSL modem and
you are SURE that the "Load Only When Needed" option
is UNCHECKED in the TCP/IP control panel, you're ready to proceed
to the next step.
IF you are using an older NuBus machine on which to run IPNetRouter,
this cable/DSL/ADSL modem connection MUST be made into the built-in
ethernet port. With PCI bus machines, the cable/DSL/ADSL modem
can be plugged into either ethernet port.
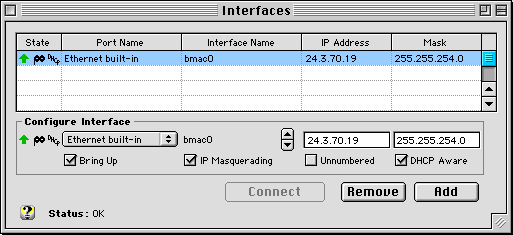
- Startup IPNetRouter on the gateway machine. In the Interfaces
window, click on the top row (with your public IP address on the
ethernet port). With this interface selected, check the "IP
masquerading" box and then press Add (if you receive your
IP address via DHCP from your cable/DSL/ADSL modem provider, then
also check the the "DHCP Aware" box). You should see
a little mask icon appear in the state column for the Ethernet
interface (and a DHCP icon if you checked the DHCP checkbox and
added this feature). Notice you need to enable IP Masquerading
on the interface that communicates directly with your cable/DSL/ADSL
modem. Your Interfaces window should now appear similar to the
following (your IP address and mask values will vary depending
upon those values assigned by your ISP):

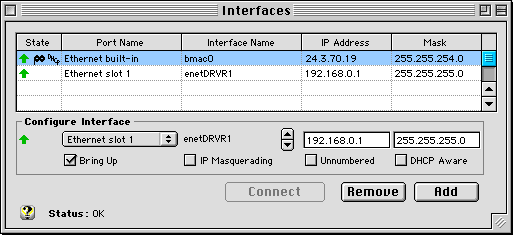
- Next you need to create a 2nd IP interface on your other Ethernet
port. Continue to work in the Interfaces window using the "Configure
Interface" input area just below the main display grid. Select
the other ethernet port from the popup menu under the Port Name
column. The corresponding interface name is entered for you automatically
(you should not need to change this). Enter a local IP Address
and Mask. We suggest 192.168.0.1 and 255.255.255.0 respectively.
Only the "Bring Up" checkbox should be checked. Press
Add. You should see all the values you just entered appear in
a new row in the main Interfaces table.

- Select SaveAs from the File menu to name and save your configuration.
Then just double click on this config file anytime you want to
startup IPNetRouter with this configuration. You can put an alias
to this config file in your Startup Items folder so that it runs
automatically at each startup. Your gateway should now be working!!!
[If it doesn't work right away, try restarting once to give Open
Transport a chance to rebuild your TCP/IP stack with the supplied
Proxy module inserted.]
Now each slave machine on your LAN needs to be configured to take
advantage of this new gateway. The general idea is as follows:
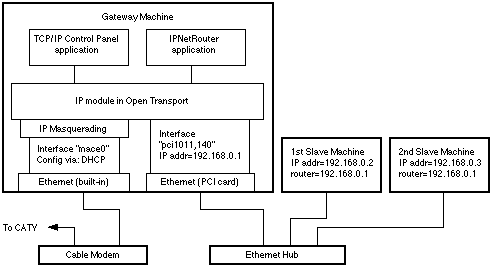
- Each slave machine needs its own unique IP address from the
same private sequence that the gateway is using. In the above
example the gateway is at 192.168.0.1, so your slaves should each
use a unique addresses like 192.168.0.2, or 192.168.0.X where
X is anything from 2 up to 255.
- All the slave machines need to be told to use the gateway machine
(192.168.0.1) to access the Internet. So set the Default Gateway
(router) parameter of all slaves to 192.168.0.1
- You can use the IPNetRouter IP address as the Name Server address
in each of the clients (e.g. 192.168.0.1). Just make sure that
the DNS forwarding option is checked in the Gateway window of
IPNetRouter. (you MUST be running IPNetRouter v1.4.8 or later
for DNS forwarding). Otherwise you need to enter the true Name
Server for your ISP in each of the client machines.
- With the dual ethernet setup, you can use the DHCP server within
IPNetRouter to configure your client machines. This may be easier
than individually and manually addressing each of the client machines
on your private network. Using the DHCP server within IPNetRouter
is quite simple: just open the DHCP window and click the DHCP
Server On checkbox and click Done. There are, however, many other
options you can configure with the DHCP server. Please see the
Help window in the DHCP window for more information.
Other servers such as mail and news servers should all be set to
the standard values specified by your provider (@Home). You may,
however, have to use FULLY SPECIFIED DOMAIN NAMES for Mail servers
when accessed from your client machines (e.g. instead of just using
"mail" for the SMTP mail server, you might have to fully
specify the name like "mail.srst1.fl.home.com"). Also
make sure the slaves each have a unique IP address and will use
the gateway (192.168.0.1) as their default gateway. On a Mac use
the TCP/IP or MacTCP Control Panel, on Win95 use the Network Control
Panel.
If you need to determine the IP address of the default Name Server
(DNS) which your ISP has you currently using, you can use the tools
in IPNetMonitor to determine this IP address. From the gateway machine,
launch IPNetMonitor and open the NSLookup Window (Name Server Lookup).
From the NSLookup window, open the Ping window (Cmd-T), this will
invoke a ping test to your default Name Server used by NSLookup.
Your default Name Server address will be visible in the Ping window.
You could then use this IP address in each of your client machines...
but just using the IPNetRouter address with DNS masquerading is
normally much easier.
If your gateway is configured using DHCP in the TCP/IP control
panel, you should check the "DHCP aware" checkbox for
the corresponding IP Interface in the IPNetRouter Interfaces window.
This tells IPNetRouter to use your dynamically assigned DHCP address
instead of the address saved with your configuration file when IPNetRouter
restores your saved settings.
IP Addressing: I chose the example IP addresses from network
192.168.x.x because this network range is reserved for private Internets
(see RFC 1918). In order to route IP datagrams between two networks,
each network must normally have its own network number (the most
significant part of the IP address logically ANDed with the network
mask). If you wish to follow the suggested example, each machine
on your ethernet LAN must have a unique address from network 192.168.0.x
(192.168.0.1, 192.168.0.2, 192.168.0.3, etc.). The Macintosh running
IPNetRouter (192.168.0.1 in this example) becomes the default router
or gateway for the other machines on your ethernet LAN.
|

 Privacy
Policy
  Contact
Us
 Privacy
Policy
  Contact
Us