
User Guide
Contents
Internet Sharing Using Remote Access (OT/PPP) and Ethernet

These directions assume that you normally connect to an Internet
Service Provider using Remote Access 3.x or OT/PPP 1.0 and that
you have your IPNR Mac connected to a working Ethernet hub. In Mac
OS 8.5 the OT/PPP control panel was renamed "Remote Access".
Open the TCP/IP Control Panel and press Cmd-K to bring up the "Configurations"
dialog. Select the PPP configuration you normally use to connect
with your ISP and rename it to "IPNetRouter". Then press
Duplicate to make a copy. Give this copy a different name like "Ethernet
LAN", press "Make Active", and then using the TCP/IP
control panel change it to "Connect via: Ethernet", enter
the IP address of this machine on your Ethernet LAN (example: 192.168.0.1),
enter the subnet mask (example 255.255.255.0), leave the router
address empty, leave the name servers as currently configured to
work with your ISP, close the control panel and save this configuration.
Note: you must have an active link to get this Ethernet configuration
to work properly.
It is important to make this new "Connect via: Ethernet"
configuration "Active" or the "primary interface"
currently selected with the TCP/IP Control Panel. If you leave PPP
as the primary TCP/IP setting, Open Transport will make TCP/IP services
unavailable and unload the TCP/IP stack when your PPP connection closes
causing your system to crash.
When IPNetRouter tries to open a PPP connection, PPP needs to be
able to find its configuration settings in the TCP/IP Preferences
File. It does this by looking for the currently selected configuration,
but we just set the TCP/IP Control Panel to a "Connect via:
Ethernet" configuration. To prevent PPP from complaining that
it is not currently selected in the TCP/IP Control Panel, IPNetRouter
temporarily modifies the TCP/IP Preferences File to make PPP appear
as if it is currently selected. Since it is possible to have more
than one PPP configuration saved in your Mac's TCP/IP preferences,
IPNetRouter uses the configuration named "IPNetRouter",
or if no such configuration exists, the first PPP configuration
it finds. For this reason you should name the PPP configuration
you want to share "IPNetRouter" in the TCP/IP control
panel.
Finally, you should make sure that the Ethernet interface does
not unload Open Transport when running IPNetRouter. To do this,
open the TCP/IP control panel in the Ethernet configuration, select
"User" from the Edit menu, select "Advanced in the
resulting dialog, click "OK". In the control panel, click
the "Options" button and make sure that "load only
when needed" checkbox is unchecked. Click OK. Now set
the user mode back to "Basic". Close the TCP/IP control
panel and save the setting.
Launch the IPNetRouter application. An "Interfaces" window
like the one below will appear.
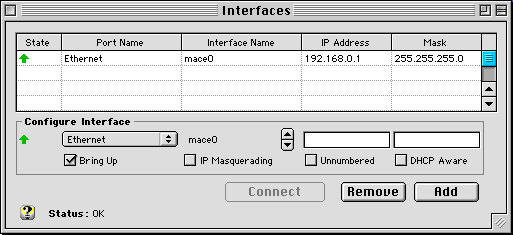
Port Name "Ethernet" is the ethernet interface you configured
using the TCP/IP Control Panel.
In the Configure Interface box, select your PPP device using the
popup menu and press "Add" button.
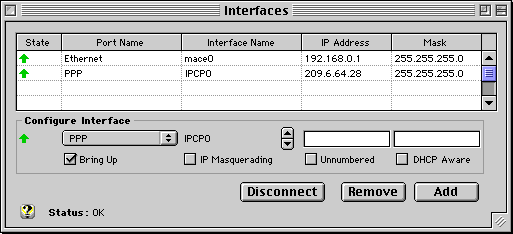
This should cause PPP to connect automatically and add an IP interface
to your ISP using the PPP device you selected.
If IPNetRouter reports no such device or address, it
means Open Transport was unable to configure OT/PPP. Make sure the
"Connect via: PPP" configuration you want IPNetRouter
to use is named "IPNetRouter" in the "Configurations"
dialog of the TCP/IP control panel that appears when you press Cmd-K
(so IPNetRouter can find it). Also make sure OT/PPP is configured
to connect automatcially when starting TCP/IP applications.
The "Routes" window should now appear as follows.
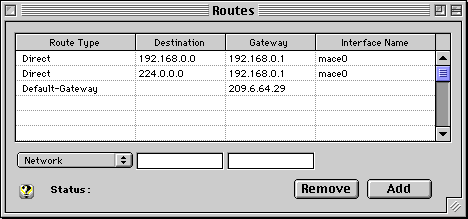
Notice the address of the Default-Gateway is very close to the
address of your PPP interface. This default gateway is a "pseudo-gateway"
at the far end of your PPP connection. If there is more than one
Default-Gateway, a router address was probably specified in the
TCP/IP Control Panel. You must remove this extra Default-Gateway
if there is no such actual gateway. Select the corresponding row
and press Remove. In general, you should only have one Default-Gateway.
If you have a Ping tool like IPNetMonitor,
you can now ping hosts on the Internet as well as hosts on your
Ethernet LAN. Congratulations, your Macintosh is now multihoming!
To allow other machines on your Ethernet LAN to use your PPP connection
to the Internet, select the PPP interface in the Interfaces window.
Notice the values from this row are copied to the Configure Interface
box below. In the Configure Interface box, check "IP Masquerading"
and then press Add (you must press Add to actually update the record
in the Interfaces table). A small mask should appear by this row
in the table.
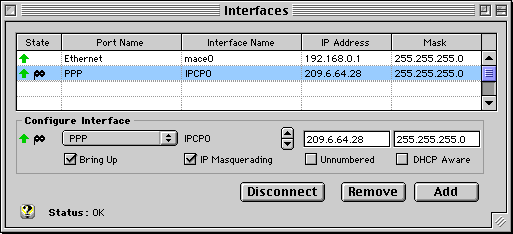
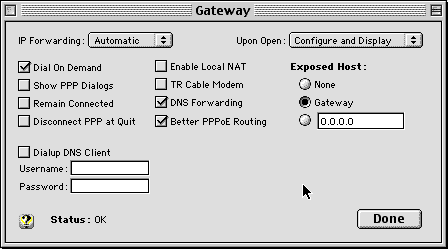
When you enable IP Masquerading, IPNetRouter automatically sets
"IP Forwarding: Automatic" in the Gateway Window.
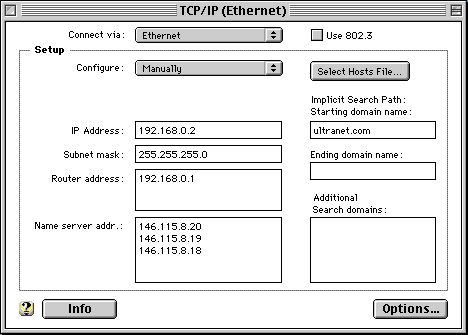
For other machines on your Ethernet LAN to connect to the Internet
through the computer running IPNetRouter (your IP Gateway), you
must configure these other machines to use your IP Gateway as their
router address (example 192.168.0.1) in the corresponding TCP/IP
Control Panels. The TCP/IP Control Panel for your First Slave Machine
might appear as follows. Note the IP address used ends in a "2".
For each LAN client you have on your network should have a unique
last number for the IP address field.
To save your IPNetRouter configuration so you can easily restore
it later, select Save under the File menu. To restore this configuration,
double-click on the resulting configuration document, or include
it in your Startup Items folder.
You can now close the Interfaces window, but you must leave the
IPNetRouter application running to continue multihoming. If your
PPP connection closes, it should reconnect automatically when there
is IP traffic for that interface. You can tell it to manually reconnect
by clicking on the "Connect" button in the Interfaces
window.
Notice the IP address of this interface and corresponding pseudo-gateway
will change if your ISP assigns you a new IP address.
Additional Notes:
Some internet software (like your ftp client) needs to send the
IP address of your Macintosh to the server. Since your Mac now has
more than one IP address (typically one for the local network and
one for the remote connection), the software may try to send the
wrong one, not aware that it needs to check which address to use.
If this happens, you will get an error from the server. This is
not a problem with multihoming, but simply a matter of updating
these applications to check which IP address to use. IP Masquerading
can provide a work around for this problem since the incorrect address
in the ftp PORT command will be translated to appear as the correct
address when IP Masquerading is enabled.
IP Addressing: I chose the example IP addresses from network
192.168.x.x because this network range is reserved for private Internets
(see RFC 1918).
In order to route IP datagrams between two networks, each network
must normally have its own network number (the most significant
part of the IP address logically ANDed with the network mask). If
you wish to follow the suggested example, each machine on your ethernet
LAN must have a unique address from network 192.168.0.x (192.168.0.1,
192.168.0.2, 192.168.0.3, etc.). The Macintosh running IPNetRouter
(192.168.0.1 in this example) becomes the default router or gateway
for the other machines on your ethernet LAN.
Enjoy!
- Peter Siche
|

 Privacy
Policy
  Contact
Us
 Privacy
Policy
  Contact
Us